Telepresence and Docker - Java Apps
Telepresence for Docker Extension - Java Applications

Try Telepresence & Docker with a sample Java app to see how fast your dev/test loop can be!
Using the Docker Desktop Extension for Telepresence lets you connect your local Docker toolchain and Java applications to your remote Kubernetes clusters. This enables you to seamlessly interact with remote dependencies as if they were running on your local machine, resulting in fast coding and testing. See how easy it is to incorporate Telepresence into your daily workflow by getting hands-on with a sample application using three Spring Boot services.
Prerequisites
- The latest build of Docker Desktop installed that supports the new Docker extensions
- Docker Desktop Extension for Telepresence installed
- Buildpacks “pack” tool installed: https://buildpacks.io/docs/tools/pack/
- Kubernetes cluster with Edge Stack installed (and ideally TLS configured)
- kubectl tool installed locally
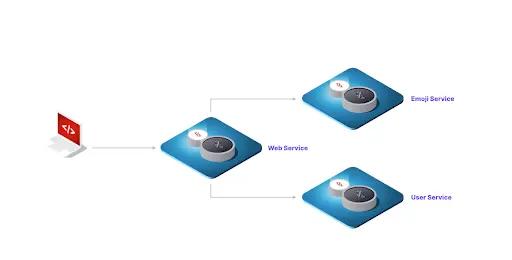
Architecture
The UserEmoji sample application provides a simple UI and API that displays a list of Users alongside their favorite Emojis:

Instructions
Clone the source code:
$ git clone :ambassadorlabs/docker-extension-telepresence-java.git
Or
$ git clone https://github.com/ambassadorlabs/docker-extension-telepresence-java.git
Change into the project directory.
$ cd docker-extension-telepresence-java
Deploy the UserEmoji services to your Kubernetes cluster
$ kubectl apply -f k8s-config/.
Export your ingress endpoint domain name or IP address in the LB_ENDPOINT environment variable:
$ export LB_ENDPOINT=$(kubectl get host -o go-template='{{range .items}}{{.spec.hostname}}{{"\n"}}{{end}}')
Or
$ export LB_ENDPOINT=$(kubectl -n ambassador get svc edge-stack \
-o "go-template={{range .status.loadBalancer.ingress}}{{or .ip .hostname}}{{end}}")
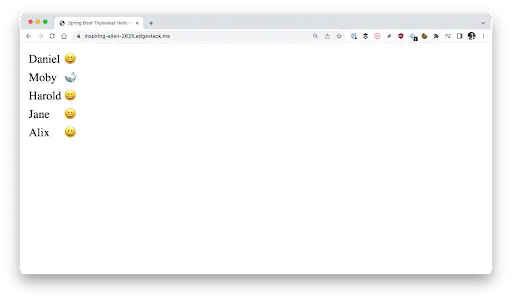
View the application web page and UI in your browser and note that only one whale emoji is being displayed!:
The Web page can be found at https://LB_ENDPOINT/
The API can be accessed via https://LB_ENDPOINT/api
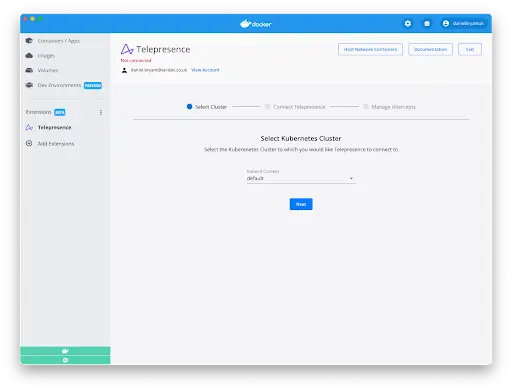
Using the Docker Desktop Extension for Telepresence, connect to your remote Kubernetes cluster by selecting the appropriate KubeConfig. If this is your first time connecting, you will need to register for an Ambassador Cloud account and get an API key. The Docker Desktop UI will guide you through this process.
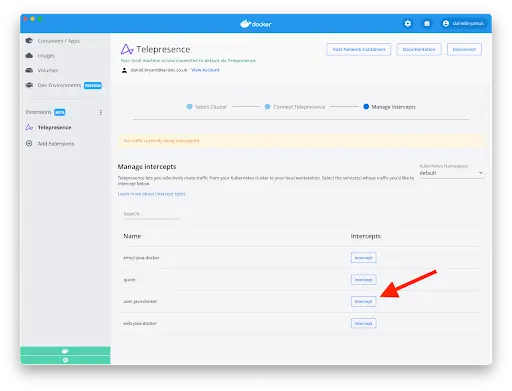
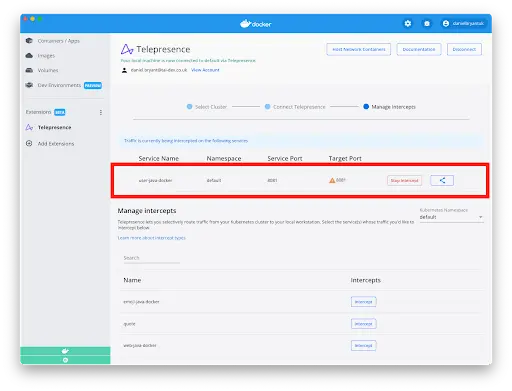
With the connection complete, look at the “Manage Intercepts” table, locate the “user-java-docker” service and click the “Intercept”
Complete the details required in the intercept popup, being sure to click “Advanced Ingress Options” are entering the IP or domain name of your Edge Stack ingress and selecting the TLS option if you have enabled this.
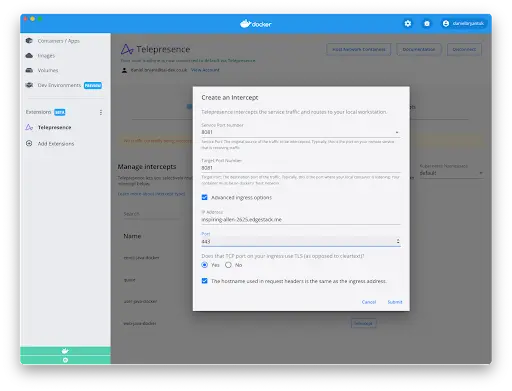
Click “Submit,” and the intercept will be created and displayed in the Docker Desktop UI.
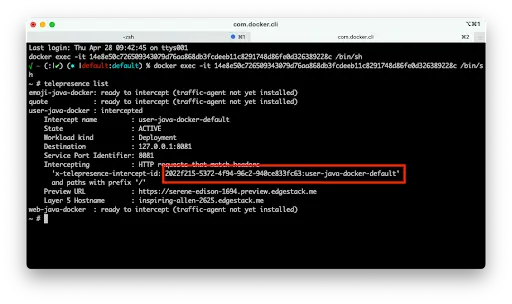
For our integration tests, we will need to acquire our unique Telepresence intercept ID header. Only requests made to the ingress with this header set will be routed to our local machine during the tests.
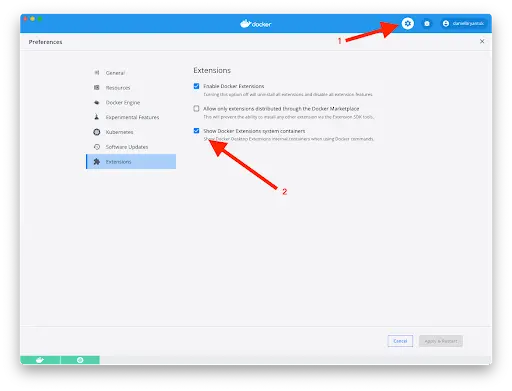
First, navigate to Docker Desktop Preferences via the cog icon on the title bar (1), and on the Preferences page enable “Show Docker Extensions systems containers” (2)

Next, navigate to the “Containers / Apps” view in Docker Desktop (1), find the “telepresence-docker-desktop-extension” container (2), and click on this to expand the options, and then click on the CLI button (3).
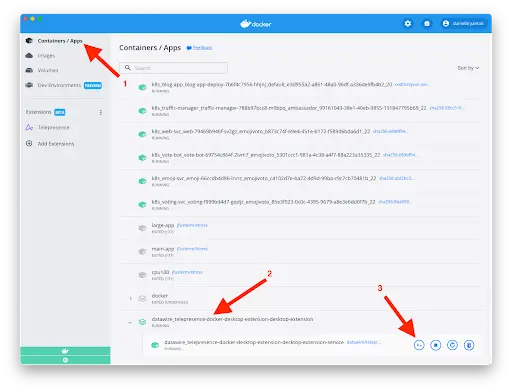
In the corresponding terminal window that opens, type “telepresence list” and copy the header token located after the “x-telepresence-intercept-id”
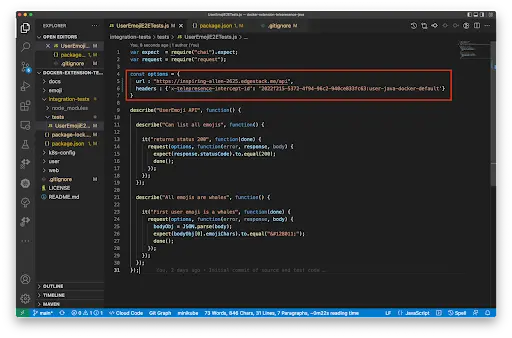
Open up the integration-test project in your favourite IDE and add both the URL for your application’s ingress (including the /api path!) and the copied x-telepresence-intercept-id to the test. In the screenshot below, you can see this demonstrated within VS code.
In order to run your tests and see the changes that you will make locally to the user-java-docker service, you will need to build the user-java-docker application container with hot reload enabled.
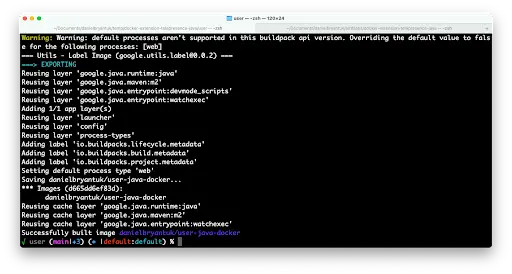
cd into the user-java-docker directory and use the CNCF Buildpacks project “pack” command to build this container. Be sure to enable GOOGLE_DEVMODE=true and this will configure the hot reload of code within the container
(the first time this command runs, it may take several minutes to complete depending on your internet connection speed)
$ cd user
$ pack build danielbryantuk/user-java-docker --builder gcr.io/buildpacks/builder:v1 --env GOOGLE_DEVMODE=true
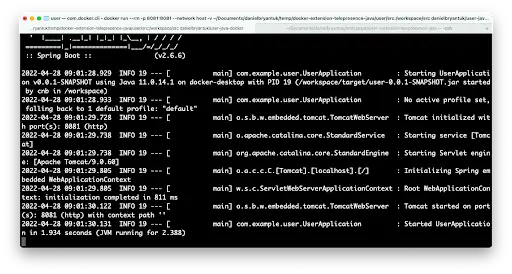
Now, run the container with the network set to “host” and the local src directory mounted. Any code changes you make locally will automatically update inside the container:
$ docker run --rm -p 8081:8081 --network host -v $(pwd)/src:/workspace/src danielbryantuk/user-java-docker
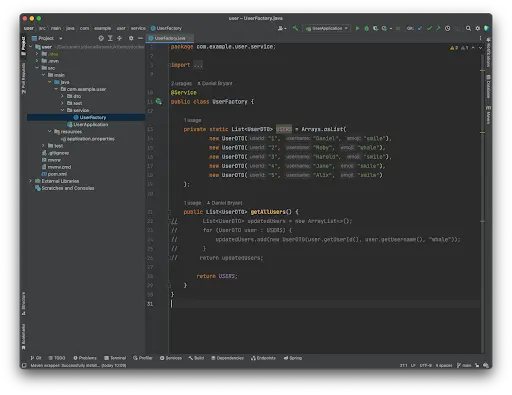
Open up the user-java-docker project in your favorite urite IDE and navigate to the UserFactory.java file. The screenshot below shows an example of this within IntelliJ IDEA
In a new terminal, build and run the Mocha end-to-end integration tests (you can also run the tests via the Mocha VS code plugin)
$ cd integration-tests
$ npm install
$ npm test
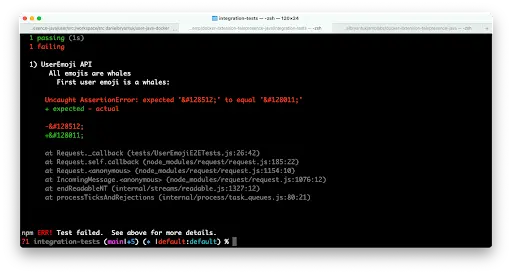
Note the success of the first test (as all Users can be listed via the API), but a failure on the second test (because all User Emojis are not whales):
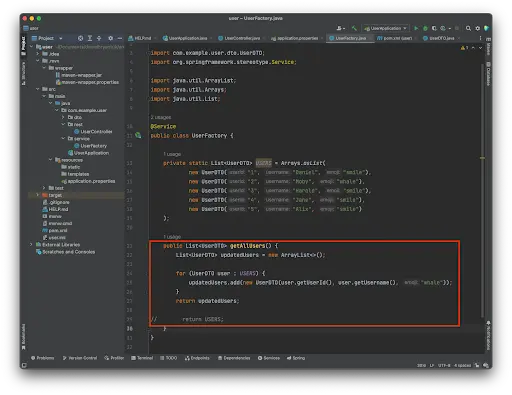
Now make a code change in the user-java-docker service via your IDE, uncommenting the currently commented-out code in the UserFactory.java getAllUsers() method. You will also need to comment-out the existing return statement. Your final code should look like this:
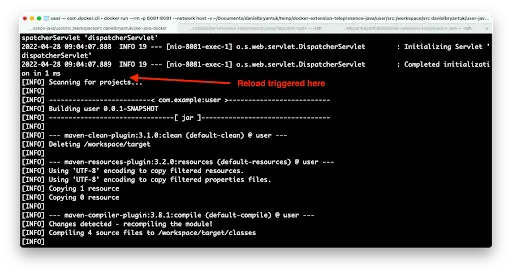
Save this file and watch the running user-java-docker container you built with pack trigger a hot reload:
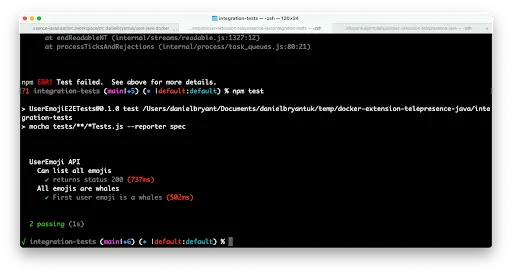
At the terminal, re-run your test suite and notice that the second test now passes.
$ npm test
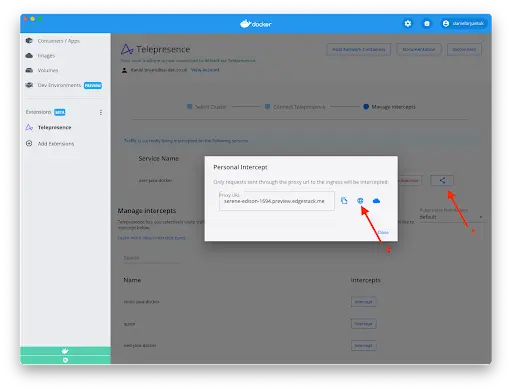
You can also view the results of your change via a secured preview URL that you can share with your teammates. Navigate to the Docker Desktop UI and click the “more details” intercept button (1). In the preview URL pop up that opens, click the “Open in browser” button (2)
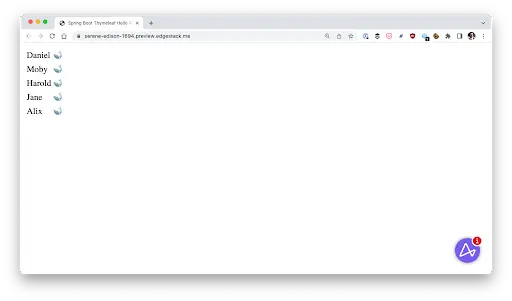
And, if you visit the main ingress URL (without using the preview URL or x-telepresence-intercept-id header), you will not see your local changes.
Wrapping up
In this tutorial you successfully used test-driven development to modify a single service running in a container locally that was being verified as part of an end-to-end integration test using Telepresence to join your local and remote environments. Let’s unpack this a little more.
Using the Docker Desktop Extension for Telepresence:
- Enabled you to run an end-to-end test against an application running in a remote Kubernetes custer, with the traffic for the service under development being rerouted to your local machine.
- Only you, or selected members of your team that you shared the Telepresence header with, will be able to see your changes in real time. Other users of the remote application will see the currently deployed version of all services.
- You made code changes to your local service using your favourite IDE, and the code was synchronized into a locally running container that was “hot reloading” all of your updates.
- You can now make a code change on your local service, trigger the hot reload, and instantly run your end to end tests to get fast feedback without having to rebuild the container, push this to a remote registry, and redeploy the service
Need setup help?
Get help with Docker, Kubernetes, and cloud technologies from our team of experts