Simplify Kubernetes Application Integration Testing with Telepresence

Cloud native applications are often composed of various microservices. More often than not, these microservices work interdependently and communicate with each other to process larger business requests.
As an example, a timeline service for a social media application may need to talk to a user profile service to determine a user's followers; and at the same time may need to talk to an authentication service to determine the authentication state of a user.
Because of this multi-directional, service-to-service communication that happens between microservices, it is crucial to perform integration testing on microservices before deploying any changes because unit testing alone doesn't always provide guarantees about the behavior of the application in the target environment (for interested readers, “Why do Integration Testing?” has more details.)
Performing integration testing in this context naturally involves running multiple services and connecting to (potentially remote) middleware and data stores. This requires techniques and tooling that make it challenging - From limited resources and inconsistent data between production and non-production environments; to managing distinct configuration for separate environments to the pain of managing service versioning, releases, and deployment cycles.
In this article, you will learn why integration testing is challenging in Kubernetes and how to overcome Kubernetes application integration testing challenges using an open source CNCF “proxying” tool called Telepresence.
Why is integration testing challenging in Kubernetes?
Integration tests require a cluster in which the versions of the microservices from the target environment are running. So, developers either spin up a new Kubernetes cluster in the continuous integration / continuous deployment (CI/CD) environment or maintain a shared Kubernetes cluster to perform integration testing. But these methods come with their own respective challenges:
Challenges with integration testing in a new (per developer) K8s cluster
- Spinning up a new Kubernetes cluster is costly both in terms of time (for the developer) and money (to pay for the cluster) and so multiple code changes are often grouped/batched to amortise this cost. This makes it hard to isolate specific code changes, thereby making troubleshooting and root cause analysis complicated.
- Constantly updating a cluster to see your latest code changes can be painful. Even after the time taken in spinning up a new K8s cluster, you also have to create a container image of your code changes, push it, & wait for it to be deployed to the Docker registry before you can run it on the new cluster. This usually takes several minutes and can make the feedback loop longer. As if this wasn’t time-consuming enough, if there’s any bug or defect in your code changes, you’d need to roll back, fix the bug, and go through the entire process explained above all over again.
- The resources in test environments are typically minimal or limited. Kubernetes (and your applications) has many dependencies, making installing all the needed dependencies time-consuming and sometimes even impossible.
Integration testing in shared K8s clusters
- Maintaining multi-tenant clusters (shared K8s cluster) for testing can become very chaotic if strict processes are not implemented and followed. For instance, the operators must always isolate tenants from each other (particularly across production and non-production environments) to minimize the damage that a compromised tenant or broken application can do to the cluster and other tenants.
- If updates aren’t carefully gated & tested, the clusters can require significant resources to debug issues, creating a bottleneck to continuous integration.
- Also, because many developers and cluster users (each with differing priorities) are sharing the same test environments, there's a high chance of getting out of sync with production environments thereby resulting in inaccurate testing.
Given the usual process of integration testing in a cloud native app (code → package image → push to docker registry → deploy to K8s cluster), a lot of time is spent waiting for containerized changes to an application (docker image) to be deployed to a cluster before any testing can commence.
How can we speed up the dev loop by eliminating the need to wait for containerized changes to your application to be deployed before testing can commence? By using a Kubernetes tool called Telepresence!
When using Telepresence you can remain within your rapid inner dev loop of code-build-verify while still testing against real dependencies (not mocks or stubs) -- this effectively “shifts left” your ability to perform integration testing earlier in your development loops.
What is Telepresence?
Telepresence is a CNCF sandbox project that enables you to connect your local development machine to a remote cluster via a two-way proxying mechanism. This empowers you to develop services locally and still test integrations with dependent services or data stores running in the remote cluster.
You can “intercept” or “re-route” any requests made to or traffic sent by a target Kubernetes workload, and code and debug your associated service locally using your preferred local IDE and in-process debugger. You can test your integrations by making requests against the remote cluster’s ingress and watching how the resulting internal traffic is handled by your service running locally.
How does it work?
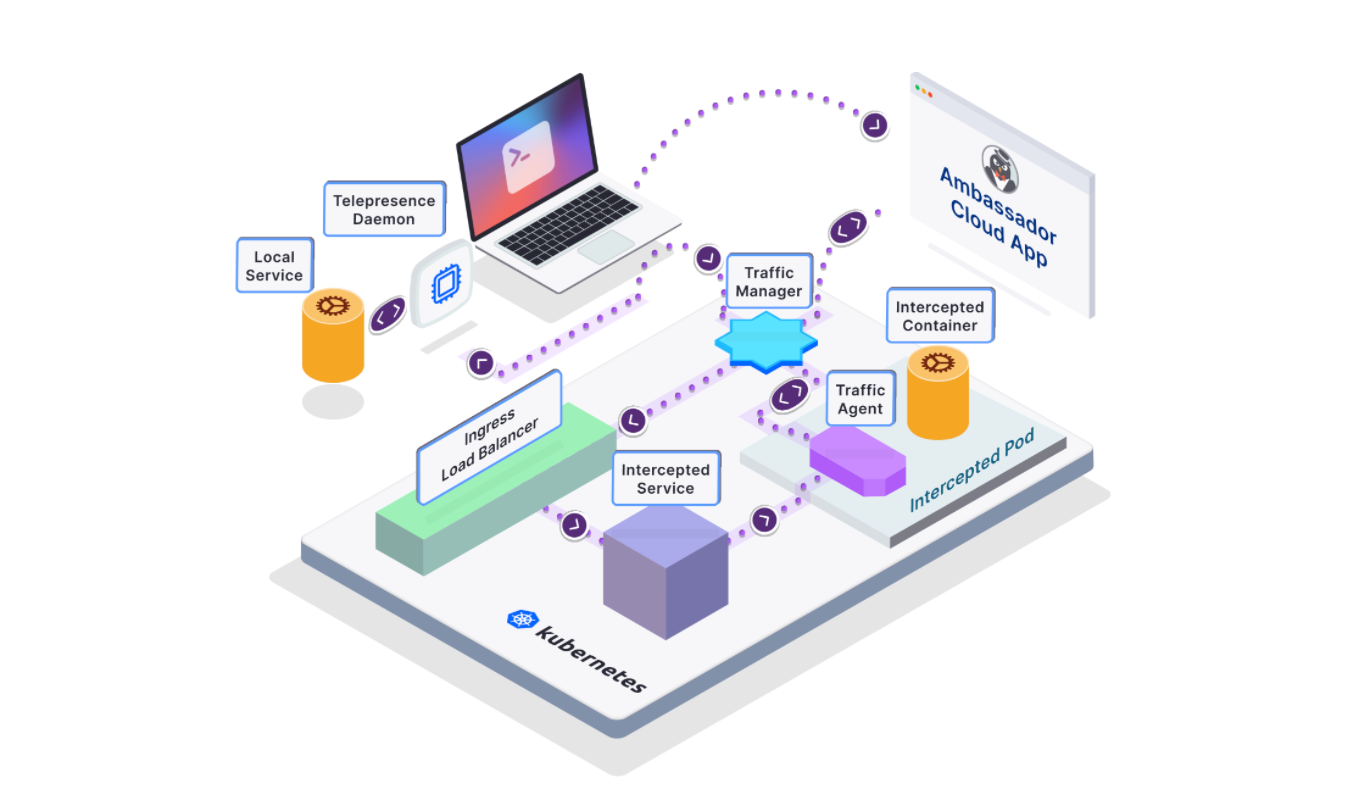
Telepresence installs a traffic-agent sidecar next to your existing application running in the remote cluster. This traffic agent supports one or more intercept mechanisms that it uses to decide which traffic to intercept.
It then captures all traffic requests going into the container, and instead of sending them to the application in the remote cluster, it routes all traffic (when you create a global intercept) or a subset of the traffic (when you create a personal intercept) to your local development environment.
This creates a workflow where:
- The application you are developing runs locally on your local development environment but thinks it is inside a remote cluster and can communicate with all other services.
- All other services on the remote cluster also think they are talking to another service inside the cluster, whereas they are talking to a service running in your local development environment.
So instead of having to build, deploy, and roll back if there’s an issue, you can create an intercept to check how it’s working. If it doesn’t work, you can still make the code changes with the intercept in place.
This accelerates the development workflow and mitigates integration issues since the development environment mirrors the live production environment.
How to use Telepresence for integration testing
Installing the Telepresence CLI on your local machine is the first step you need to take to start using Telepresence. We have different installation options for GNU/Linux, macOS, and Windows users here.
After installing the Telepresence CLI, run
telepresence connect$ telepresence connectLaunching Telepresence Daemon...Connected to context default (https://<cluster public IP>)
To confirm Telepresence is working as expected, let’s connect to the Kubernetes API server using:
curl -ik https://kubernetes.default$ curl -ik https://kubernetes.defaultHTTP/1.1 401 UnauthorizedCache-Control: no-cache, privateContent-Type: application/json...
As you can see, it returned a 401 response, and although this is an error this signifies that we could actually contact the remote K8s PI thanks to Telepresence.
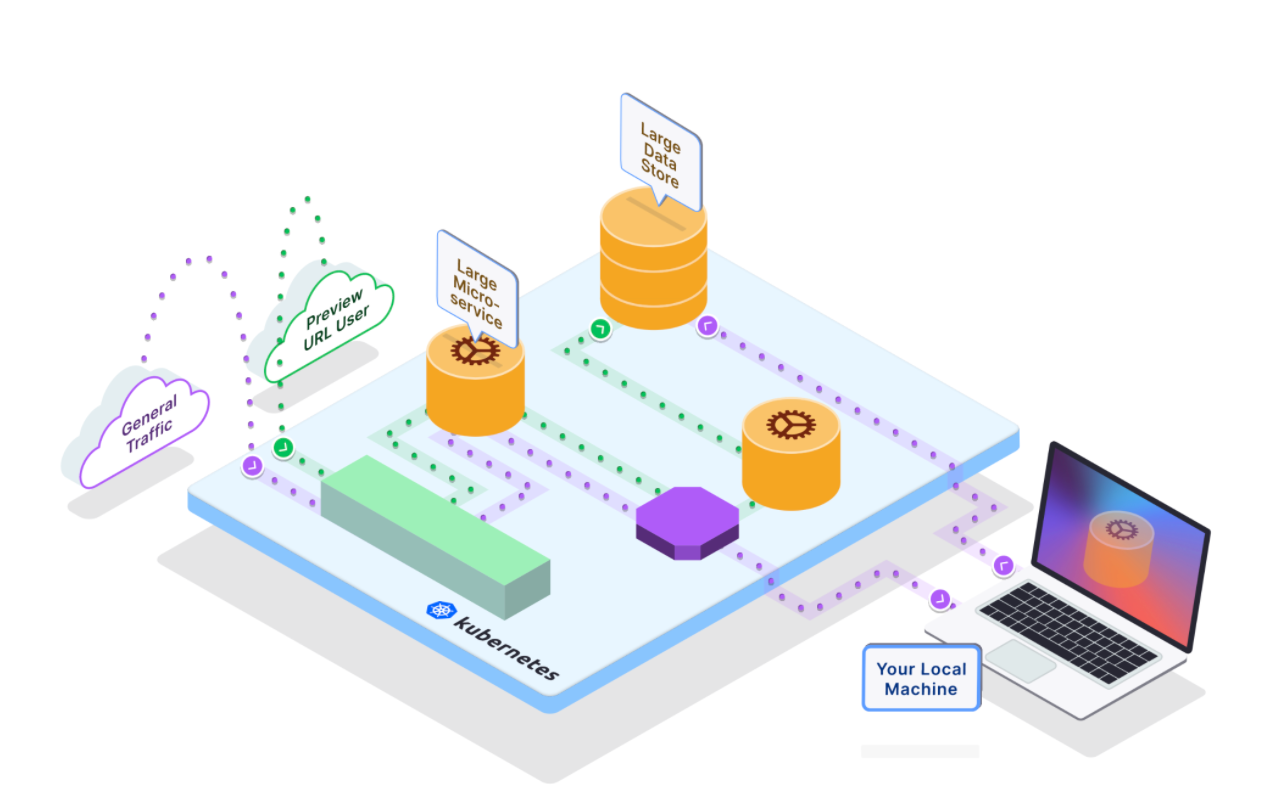
Now that you’ve confirmed Telepresence is working, let’s create a personal intercept that will tell Telepresence to reroute or send traffic to the service running in your local development environment instead of the service in the remote cluster.
To do this, log into Ambassador Cloud using:
telepresence login<service-name> --port <local-port>[:<remote-port>] After you’ve intercepted the service, Telepresence will talk to Ambassador Cloud to generate a "preview URL" for you. This preview URL is set up such that traffic going through that URL gets intercepted and sent to your local environment.
For Telepresence to create this preview URL, it needs to know how cluster ingress works for your service. So, you will be required to answer the following questions on your terminal:
1/4: What's your ingress' layer 3 (IP) address?You may use an IP address or a DNS name (this is usually a "service.namespace" DNS name)[default: ambassador.ambassador]:2/4: What's your ingress' layer 4 address (TCP port number)?The port on which your ingress controller is listening (often 80 for non-TLS and 443 for TLS). [default: 80]:3/4: Does that TCP port on your ingress use TLS (as opposed to cleartext)?Respond with n if your answer is no or y if your answer is yes [default: n]:4/4: If required by your ingress, specify a different layer 5 hostname(TLS-SNI, HTTP "Host" header) to access this service.[default: ambassador.ambassador]:
After answering the questions above, a preview URL will be generated for you:
Using Deployment example-serviceinterceptedIntercept name : example-serviceState : ACTIVEWorkload kind : DeploymentDestination : 127.0.0.1:8080Service Port Identifier: httpIntercepting : HTTP requests that match all of:header("x-telepresence-intercept-id") ~= regexp("<intercept id>:example-service")Preview URL : https://<random domain name>.preview.edgestack.meLayer 5 Hostname : dev-environment.edgestack.me
Copy the preview URL printed on your terminal and access it on your browser to see that your local service is now processing the request.
With this, you can now make changes and see them reflected when interacting with your Kubernetes environment, query services only exposed in your cluster's network, and even set breakpoints in your IDE to investigate bugs. Amazing right? We know!
You can also share this preview URL with your teammates or engineering manager to review your changes.
Summary
Any testing strategy should aim to provide coverage to both each layer of a microservice-based application stack and also between the service layers while remaining lightweight.
Unit testing alone doesn't offer guarantees about the behavior of Cloud-native applications as this type of application is typically composed of many microservices that communicate with each other. Performing integration testing in addition to unit testing is always the way to go.
Telepresence allows developers to do real-world testing of microservices at scale, without the overhead of maintaining (and paying for) separate dedicated test clusters/environments, constant container builds & rollouts, and possible disruption failures in running clusters.