JavaScript & Kubernetes: Rapidly Developing JavaScript Microservices

Build a cloud development environment with Telepresence & NodeJS
Build a cloud development environment with Telepresence & NodeJS
Modern organizations adopt Kubernetes to ship features faster. With Kubernetes, users can deploy and scale containerized applications at any scale: from one service to thousands of services. Oftentimes, the Kubernetes learning curve is particularly steep, especially for application developers. Kubernetes application development calls for new processes and new tools. So how do JavaScript developers create a development workflow on Kubernetes that is fast and effective?
There are two main challenges associated with building productive development experiments on Kubernetes:
- Kubernetes applications are designed to be native to the cloud, but most legacy development workflows are built for local development.
- Kubernetes applications are built on a microservices architecture. The development environment becomes more complex as new microservices add additional dependencies to your application. These services quickly become too resource-intensive and exceed the limits of your local machine.
In this tutorial, we’ll set up a development environment for Kubernetes and make a change to a NodeJS microservice. To develop locally, we’d have to wait for a container build, push to a registry and deploy to see the effect of our code change. Instead, we’ll use Telepresence to see the results of our change instantly.
Step 1: Deploy a Sample Microservices Application
For this example, we’ll make code changes to a NodeJS service running between a resource-intensive Java service and a large datastore. We’ll start by deploying a sample microservice application consisting of 3 services:
- : A memory-intensive service written in Java that generates the front-end graphics and web pages for our application
VeryLargeJavaService - : A NodeJS service that manages requests for information between the two services.
DataProcessingService - : A large datastore service that contains the sample data for our Edgey Corp store.
VeryLargeDataStore
Note: We’ve called these VeryLarge services to emphasize the fact that your local environment may not have enough CPU and RAM, or you may just not want to pay for all that extra overhead for every developer.
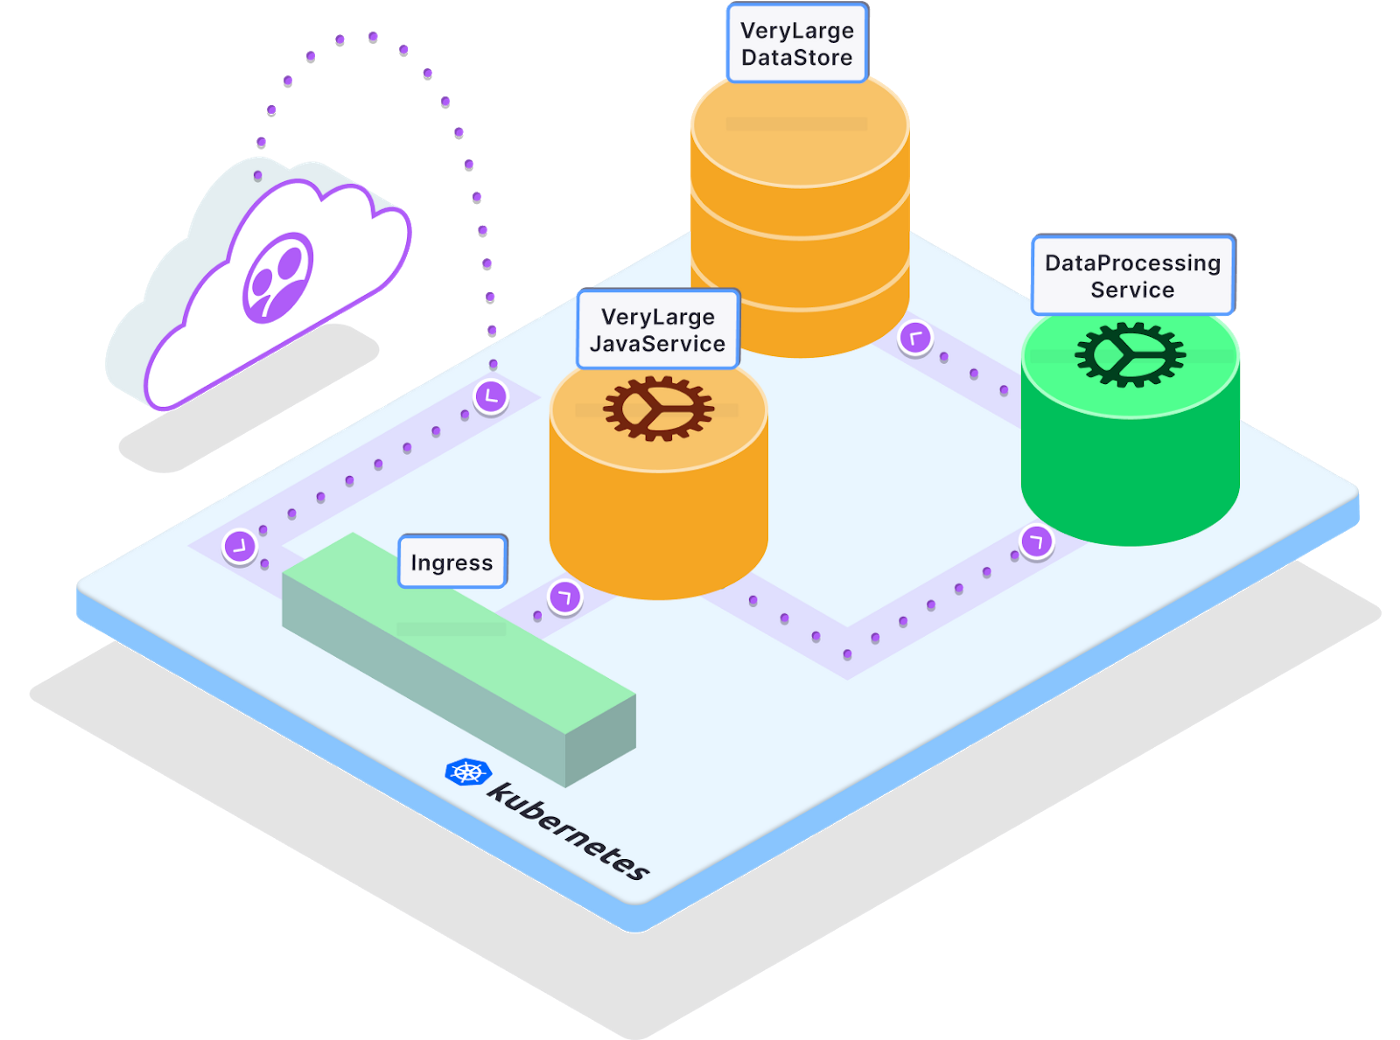
In this architecture diagram, you’ll notice that requests from users are routed through an ingress controller to our services. For simplicity’s sake, we’ll skip the step of deploying an ingress controller in this tutorial. If you’re ready to use Telepresence in your own setup and need a simple way to set up an ingress controller, we recommend checking out the Edge Stack API Gateway.
1. Deploy the sample application to your Kubernetes cluster
kubectl apply -f https://raw.githubusercontent.com/datawire/edgey-corp-nodejs/main/k8s-config/edgey-corp-web-app-no-mapping.yaml
Step 2: Set up your local development environment
We’ll need a local development environment so that we can edit the
DataProcessingServiceDataProcessingServiceVeryLargeJavaServiceVeryLargeDataStore1. Clone the repository for this application from GitHub.
$ git clone https://github.com/datawire/edgey-corp-nodejs.git
2. Change directories into the DataProcessingService
$ cd edgey-corp-nodejs/DataProcessingService
3. Install dependencies and start the service locally.
$ npm install && npm start
4. You should now see your service running!
==trimmed===Welcome to the DataProcessingNodeService!{ _: [] }Server running on port 3000
5. 5. Test the application. In another terminal, we’ll send a request to the service, which should return
blue$ curl localhost:3000/color“blue”
Step 3: Rapid development with Telepresence
Instead of waiting for a container image to build, pushed to a repository, and deployed to a Kubernetes cluster, we are going to use Telepresence which creates a bidirectional network connection between your local development and the Kubernetes cluster to enable fast, efficient Kubernetes development.
1. Download Telepresence (~60MB):
# Mac OS Xsudo curl -fL https://app.getambassador.io/download/tel2/darwin/amd64/latest/telepresence -o /usr/local/bin/telepresence#Linuxsudo curl -fL https://app.getambassador.io/download/tel2/linux/amd64/latest/telepresence -o /usr/local/bin/telepresence
2. Make the binary executable
$ sudo chmod a+x /usr/loca/bin/telepresence
3. Test Telepresence by connecting to the remote Kubernetes cluster
$ telepresence connect
4. Send a request to the Kubernetes API server:
$ curl -ik https://kubernetes.default.svc.cluster.localHTTP/1.1 401 UnauthorizedCache-Control: no-cache, privateContent-Type: application/jsonWww-Authenticate: Basic realm="kubernetes-master"Date: Tue, 09 Feb 2021 23:21:51 GMT
Great! You’ve successfully configured Telepresence. Right now, Telepresence is intercepting the request you’re making to the Kubernetes API server, and routing over its direct connection to the cluster instead of over the Internet.
Step 4: Intercept your NodeJS service
An intercept is a routing rule for Telepresence. We can create an intercept to route traffic intended for the
DataProcessingServiceDataProcessingService1. Create the intercept
telepresence intercept dataprocessingservice --port 3000
2. Access the application directly with Telepresence. Visit
http://verylargejavaservice:80803. Now, we’ll make a code change. Open
edgey-corp-nodejs/DataProcessingService/app.jsDEFAULT_COLORblueorange4. Reload the page in your browser, and see how the color has changed from blue to orange.
That’s it! With Telepresence we saw how quickly we can go from editing a local service to seeing how these changes will look when deployed with the larger application. When you compare it to our original process of building and deploying a container after every change, it’s very easy to see how much time you can save especially as we make more complex changes or run even larger services.
Learn More about Telepresence
Typically, developers at organizations adopting Kubernetes face challenges slow feedback loops from inefficient local development environments. Today, we’ve learned how to use Telepresence to set up fast, efficient development environments for Kubernetes and get back to the instant feedback loops you had with your legacy applications.
- Read the docs
- Watch the demo video
- Read more about Intercepts
- Learn about Preview URLs for easy collaboration with teammates
Telepresence
Simplify developer collaboration and bridge the gap between local and remote Kubernetes development environments