Application Developer’s Guide to Setting Up Kubernetes with Minikube on Windows Pro
How to set up a local Kubernetes cluster on Windows to test applications easily
Local Kubernetes Options
How to Install Minikube
Create a Kubernetes Cluster using Minikube
Verify the Kubernetes Cluster configuration
Create a Multi-Node Kubernetes Cluster
Mounting Folders to the Kubernetes Cluster
Conclusion
More Learning
How to set up a local Kubernetes cluster on Windows to test applications easily
Containerized applications offer many advantages over traditional deployments, from ease of management to scalability and isolation. Hence, combining containerized applications with a proper orchestration engine is the best way to manage modern applications in both staging and production environments.
As Windows Developers, we need a proper Kubernetes environment to test our applications. This article focuses on setting up a local Kubernetes cluster that enables us to test our applications easily. To do this, we will cover:
- Local Kubernetes options
- How to install MiniKube
- How to create a Kubernetes cluster using MiniKube
- How to create a multi-node Kubernetes cluster
- How to mount folders to Kubernetes cluster
Local Kubernetes Options
There are multiple options to create a local Kubernetes cluster on a Windows environment, such as;
- Minikube- This is the most widely used feature-packed tool to implement local Kubernetes clusters on Windows, Linux, or Mac environments.
- Docker Desktop- Docker Desktop for Windows is the simplest solution that comes bundled with the ability to spin up a local Kubernetes cluster.
- kind- This is a tool to create Kubernetes clusters using docker containers as nodes. The primary focus of this tool is to test Kubernetes, while it can also be used for other purposes such as application deployments, testing, etc.
However, I prefer Minikube over others as it is a standalone solution with a lot of features useful for managing a local Kubernetes cluster.
How to Install Minikube
Minikube depends on a container or a virtual machine manager to deploy a Kubernetes cluster. Some of the virtual machine managers it supports are Docker, Hyper kit, Hyper-V, KVM, Parallels, Podman, VirtualBox, and VMWare. Since we are using a Windows environment, we can simply use the inbuilt Hyper-V virtualization. However, Hyper-V is not available in the Windows Home edition. Therefore, you will have to use a third-party solution like Virtual Box if you are a Windows Home user.
For installation, Minikube offers multiple options such as a simple executable, using the Windows Package Manager, or the Chocolatey Package Manager.
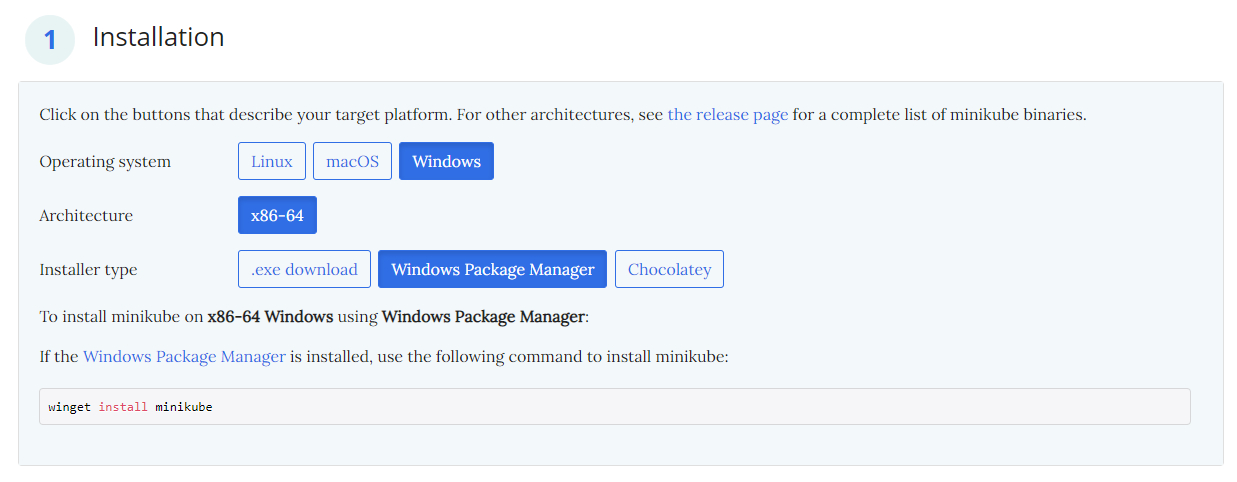
You can use any of the options mentioned above to install Minikube. I will be using the Windows Package Manager in this tutorial. Run the
winget install minikube Even with Minikube, we need the kubernetes-cli (kubectl) installed locally to connect and communicate with the Kubernetes cluster. Kubernetes offers two methods to install kubectl.
- Download the kubectl binary and add it manually to the windows path
- Use a package manager like Chocolatey or Scoop to install the kubectl and get it added to the path automatically. (Currently, Winget does not support installing kubectl)
Chocolaty kubernetes-cli installation command
choco install kubernetes-cli
Once the installation is completed, we can verify if it is successfully installed by checking the kubectl client version. For that, run the following command;
kubectl version --client
RESULT

Create a Kubernetes Cluster using Minikube
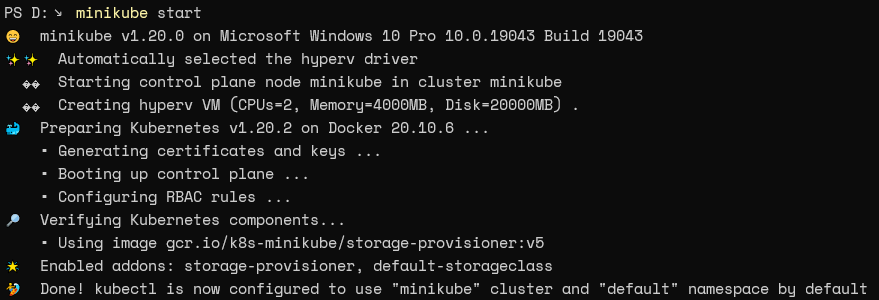
After the installation, we can simply use the start command to spin up a single-node Kubernetes cluster. This will create a Kubernetes cluster with the default values. Minikube defaults to Hyper-V driver in the Windows environment.
However, it is advisable to create a separate network switch to ensure network connectivity. This separation allows users to use other tools such as Docker Desktop without any conflict with minikube services.
Setting up Network Switch
Minikube will automatically create a separate network Virtual Switch as required when creating the local cluster. Besides, we can manually create a virtual switch dedicated for local Kubernetes in the Hyper-V manager
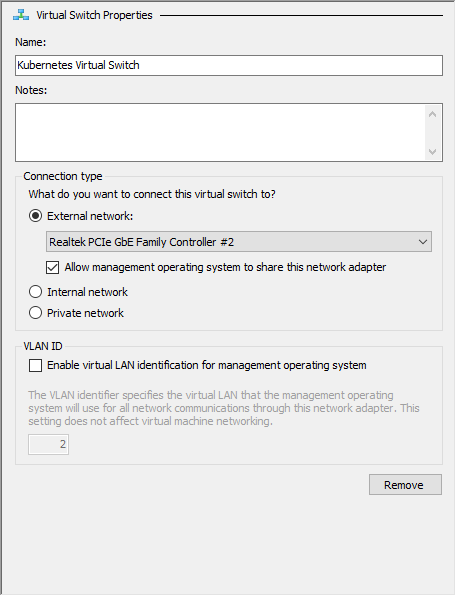
1. Navigate to Hyper-V Manager and click on Virtual Switch Manager.
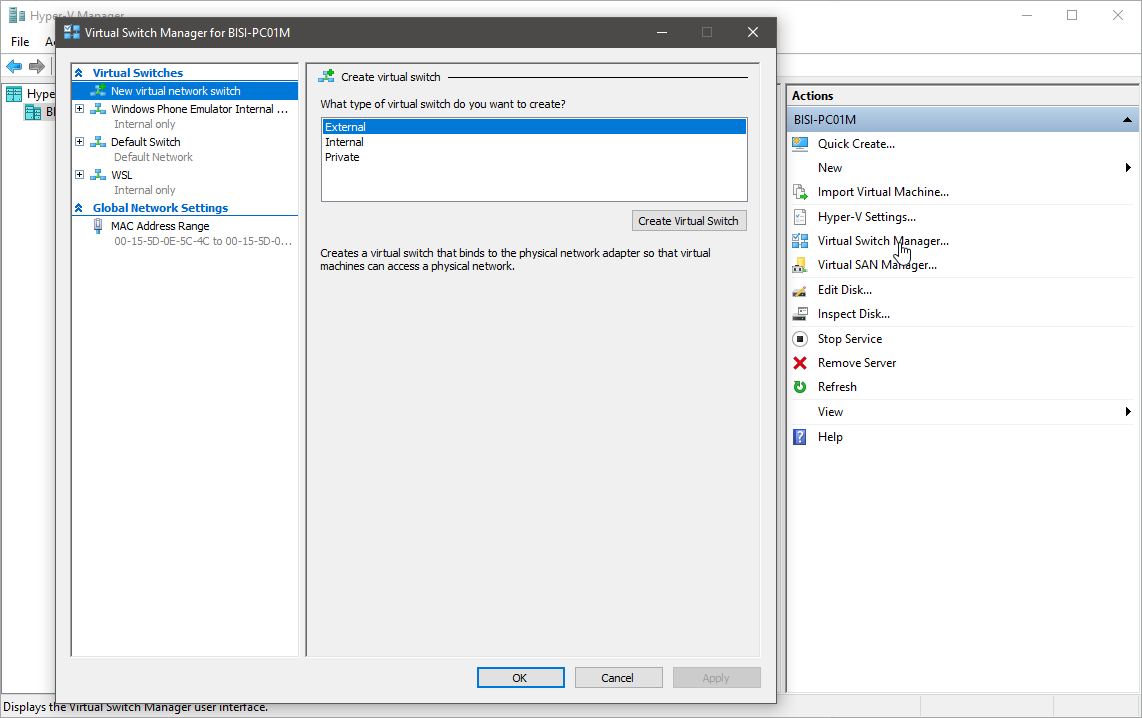
2. Select External type and click on Create Virtual Switch.
3. Provide a name for the switch and select the network connection to be used. (This can be either an ethernet interface or a wifi interface). Finally, apply the changes.
Starting Minikube with Custom Options
We need to specify some custom options to match the Kubernetes cluster with the local Windows environment. The most commonly specified options are resource usage and network connectivity.
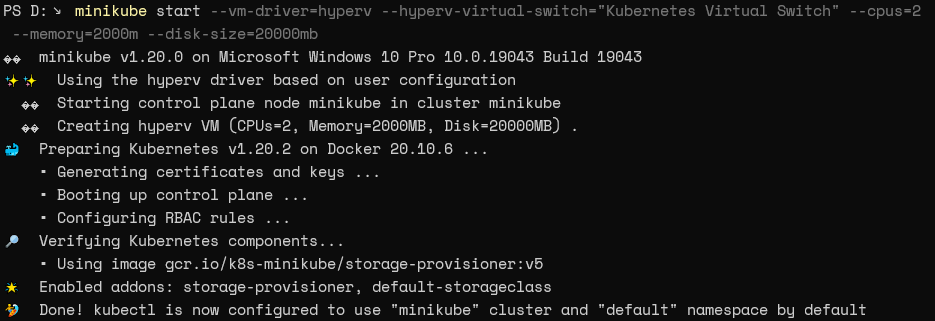
minikube start --vm-driver=hyperv --hyperv-virtual-switch="Kubernetes Virtual Switch" --cpus=2 --memory=2000m --disk-size="20000mb"
In the above startup string, we are explicitly providing the following options when creating the Kubernetes cluster.
- - Enforces Hyper-V to be used as the virtualization engine
--vm-driver=hyperv - - Points to the custom Virtual Switch we have created previously
--hyperv-virtual-switch="Kubernetes Virtual Switch" - - Limit the CPU count
--cpus=2 - - Limit the memory to 2GB
--memory=2000m - - Define a disk size of 30GB
--disk-size=”20000mb”
This will create a single-node Kubernetes cluster with the user-configured options. You can customize the Kubernetes cluster further using the startup options offered by Minikube.
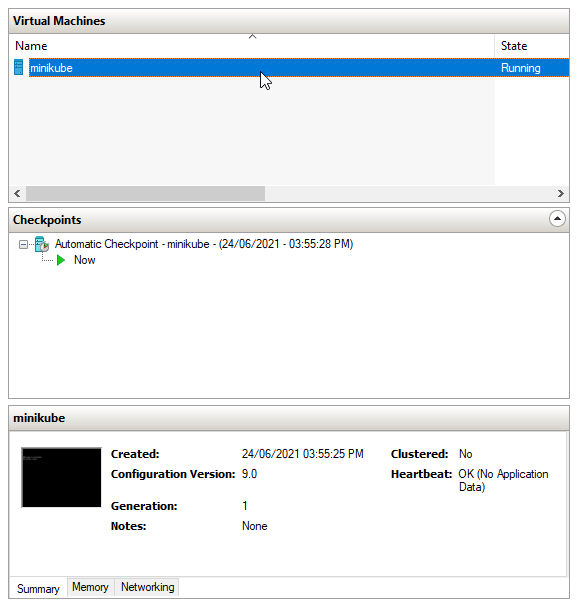
If we look at the Hyper-V manager, we can see that a single minikube instance has been created.
Verify the Kubernetes Cluster configuration
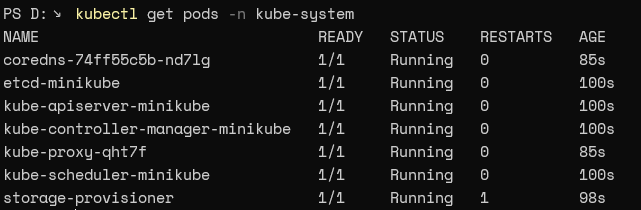
We can simply run the kubectl to get the system pods of the Kubernetes cluster and thereby identify a successful configuration.
kubectl get pods -n kube-system
RESULT
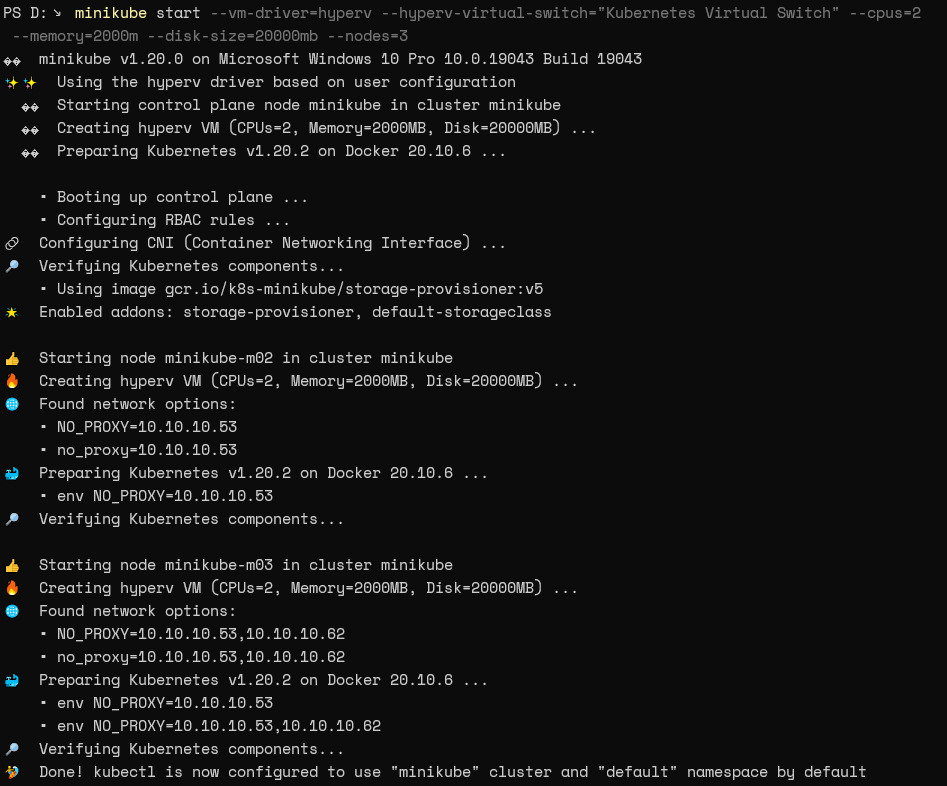
Create a Multi-Node Kubernetes Cluster
We can use the --nodes option to create a multi-node cluster if we need to simulate a multi-node Kubernetes installation. There, the only consideration is the availability of resources in the local machine.
minikube start --vm-driver=hyperv --hyperv-virtual-switch="Kubernetes Virtual Switch" --cpus=2 --memory=2000m --disk-size=20000mb --nodes=3
The above command will create a Kubernetes cluster with three nodes.
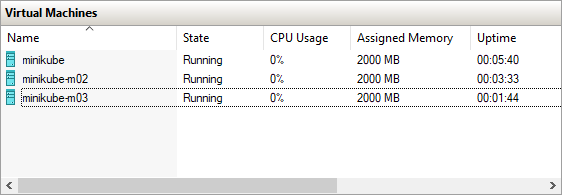
We can see that three separate minikube nodes are created in the Hyper-V manager.
Mounting Folders to the Kubernetes Cluster
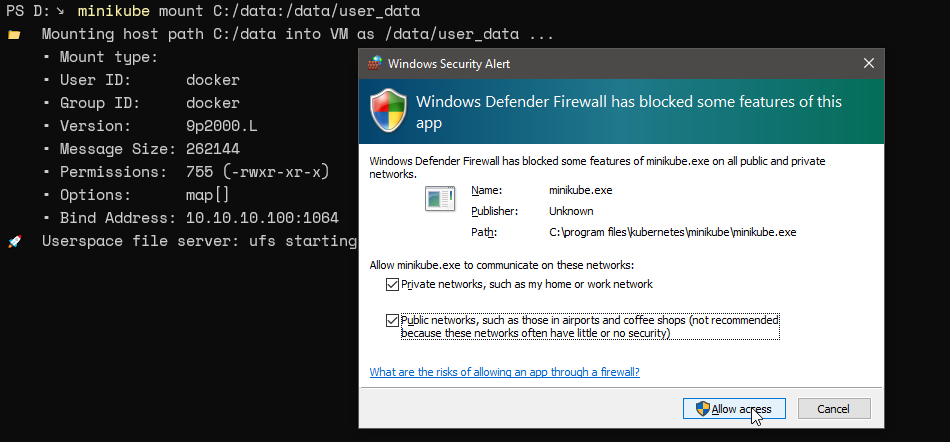
Since we are using a hypervisor (Hyper-V), the Kubernetes nodes do not have access to the host machine. Minikube provides users with the mount option to map a host directory to the Kubernetes cluster.
In the following example we are mounting the
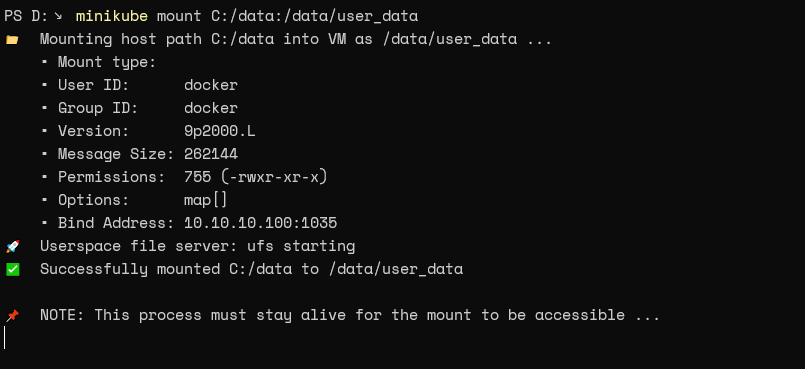
C:/data/data/user_data/minikube mount C:/data:/data/user_data
The above command will prompt users with a message from the Windows Firewall to allow access to minikube through the firewall. Here, you have to Allow the access, or otherwise, the mount will fail. (Grant permissions according to the network configuration)
In the end, minikube will notify a successful mount. However, this mount is not permanent, and the user needs to keep the PowerShell window open (process running) to maintain the mount.
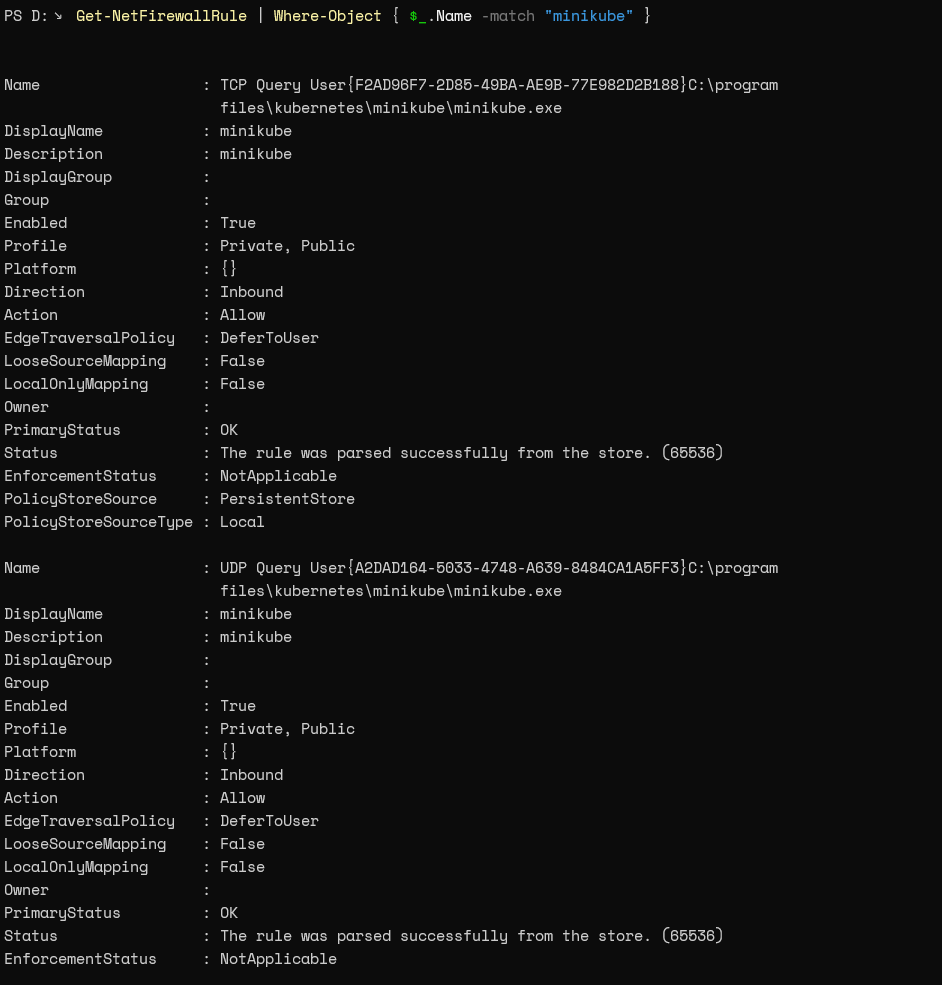
Verifying Firewall Rules
We can identify the firewall rules created by running the following command through Powershell.
Get-NetFirewallRule | Where-Object { $_.Name -match "minikube" }
RESULT
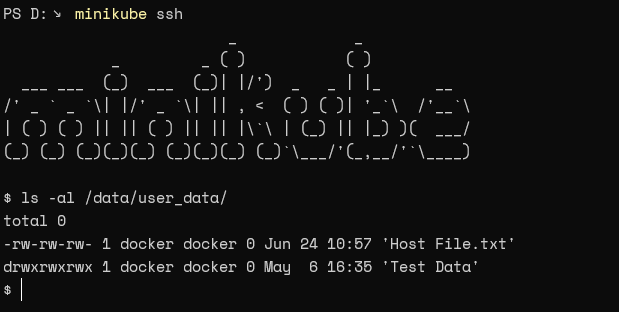
Verifying the Mounted Directory
To verify the mount, run “minikube ssh” command on a PowerShell window. It will establish an ssh connection to minikube. Next, view the directory listing with the ls command.
minikube sshls -al /data/user_data/
A successful mount will show the files in the host machine within the minikube directory.
Conclusion
Tools like minikube can be used to simplify local Kubernetes configurations. Additionally, Windows Developers can utilize minikube with Windows-based tools and technologies like Winget, Chocolatey, and Hyper-V to natively support Kubernetes and have optimal performance. It also eliminates configuration issues that may arise with third-party tools.
We can easily tailor the Kubernetes deployment to meet our exact needs using some custom configurations. This ease of use enables us to create, test and deploy containerized applications in Kubernetes easily.
More Learning
Getting started is easy:
- Join us on the community Slack
If you'd prefer to learn independently and on your own time, you can also check out our local development environments learning journey. This learning journey walks you through the primary concepts and hands-on activities required to create an effective local development environment with Kubernetes, which includes everything from the containerization of code to real-time local testing of distributed services.